


A small ceiling leak may seem minor, but it can be an early warning sign of larger roof problems. That is why roof inspection is so important. It is not just a quick visual check, but a careful process that helps homeowners find damage early and avoid expensive repairs later. Regular inspections can reveal issues such as worn shingles, damaged flashing, poor ventilation, and water intrusion before they become serious.
This guide explains what to look for both inside and outside the home, making roof inspection easier for beginners and experienced homeowners alike. Key areas include shingles, gutters, attic conditions, flashing, and signs of moisture such as stains or mold. Understanding these warning signs helps you take action sooner and protect the overall condition of your roof.
By learning how often to inspect your roof, what problems to watch for, and when to call a professional, you can stay ahead of costly damage. A thorough roof inspection gives you more confidence, saves money over time, and helps keep your home safe, dry, and structurally sound.
Key Takeaways
- Roof inspection helps detect small problems early before they turn into major and expensive repairs.
- Even a minor ceiling leak can signal hidden damage in the roof system.
- A complete roof inspection should include both exterior and interior areas of the home.
- Key exterior areas to inspect include shingles, flashing, gutters, valleys, ridges, and vents.
- Key interior areas include the attic, insulation, ceilings, and walls for signs of moisture, mold, or daylight.
- Warning signs such as cracked shingles, granule loss, sagging spots, water stains, and poor ventilation should never be ignored.
- Regular roof inspections can extend roof lifespan and protect your home’s value and structural integrity.
- Seasonal inspections, especially in spring and fall, help prepare the roof for changing weather conditions.
- Gutters, drainage, ventilation, and insulation all play an important role in overall roof health.
- Taking photos and keeping records during inspections makes it easier to track wear over time and plan repairs.
- A professional inspection is recommended when damage is hard to assess, the roof is steep, or safety is a concern.
- A thorough roof inspection is not just maintenance, it is a proactive investment in your home’s safety, comfort, and longevity.
Why Roof Inspection Is More Important Than You Think
A roof inspection might seem like just another task on your home maintenance checklist, but its true importance often goes underestimated until problems arise. Understanding what a roof inspection entails, especially when following a comprehensive roof inspection checklist, can save homeowners thousands of dollars and prevent unexpected headaches. So, why is roof inspection so critical, and what benefits does it actually bring?
A roof inspection is a detailed examination of both the interior and exterior parts of your roof to assess its current condition and identify potential issues before they escalate. Whether you’re a homeowner preparing for seasonal weather changes or a landlord ensuring tenant safety, knowing the ins and outs of a roof inspection is essential. According to the National Roofing Contractors Association, regular roof inspections can extend the lifespan of your roof by up to 25%, which means fewer costly replacements and repairs over time.
The importance of roof inspection stems from the fact that roofs are continuously exposed to harsh environmental elements, rain, wind, snow, heat, and even falling debris. These factors can cause gradual deterioration such as missing shingles, cracked flashing, mold buildup, or structural weaknesses. Without early detection, small cracks or leaks can evolve into major repairs involving water damage to ceilings, walls, and insulation.
For example, take the story of the Thompson family from Ohio. They ignored minor signs of wear on their roof for over a year, dismissing a few curled shingles and small puddles inside the attic. However, a professional roof inspection later revealed significant water damage that had begun rotting wooden beams, threatening the structural integrity of their home. Addressing the problem sooner with a thorough roof inspection checklist could have prevented thousands in repair costs and stress.
Incorporating both inside and outside checks in your roof inspection ensures no stone is left unturned. Interior inspections might look for signs of moisture, mold, or daylight showing through the attic ceiling, while exterior inspections focus on the physical condition of shingles, gutters, vents, and flashing. This holistic approach helps identify vulnerabilities from every angle.
Ultimately, a roof inspection is more than a routine chore, it’s an investment in your home’s safety, value, and longevity. By regularly using a roof inspection checklist, homeowners can confidently prevent minor issues from becoming major repairs, keeping their property secure and comfortable year-round.
How to Perform a Roof Inspection Step by Step
Conducting a thorough roof inspection is key to maintaining your home’s structural integrity and preventing costly repairs down the line. Whether you’re a proactive homeowner or a professional, following a clear, systematic approach ensures no detail is overlooked. Here’s a comprehensive, step-by-step guide to help you carry out an effective roof inspection both inside and outside your house.
Step 1: Gather Your Tools and Safety Equipment
Before climbing up to the roof, make sure you have the necessary tools and safety gear at hand:
– Sturdy ladder (preferably with stabilizers)
– Work gloves
– Safety harness (if available)
– Binoculars (for distant viewing)
– Flashlight
– Camera or smartphone (to document findings)
– Notepad or a printed roof inspection checklist
– Moisture meter (optional, for detecting leaks inside)
Safety is paramount. Never perform a roof inspection during bad weather or when the roof is wet and slippery.
Step 2: Inspect Roof from the Ground Using Binoculars
Start with an external overview without climbing on the roof:
– Look for missing, cracked, or curling shingles.
– Check for visible sagging or uneven areas.
– Spot evidence of moss, algae, or heavy debris accumulation.
– Examine the flashing around chimneys, vents, and skylights for rust or gaps.
– Identify any gutters clogged or damaged.
Using binoculars, you can spot many potential problems safely and quickly.
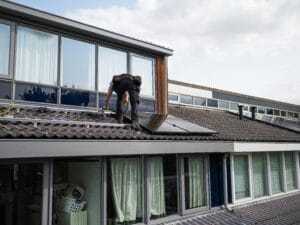
Step 3: Climb Up and Conduct a Close-up Visual Inspection
With safety precautions, carefully ascend your ladder and inspect the roof surface up close:
– Walk the roof if sturdy and safe, otherwise visually scan by hand from the edge.
– Look closely at shingle granules washed away or worn edges.
– Check for loose or missing roof tiles or shingles.
– Examine roof valleys and ridges thoroughly, the most common leak points.
– Inspect seals around chimneys, vents, and skylights. Any cracking or lifting here is a concern.
– Look for signs of rust or corrosion, especially on metal roofing or flashing.
– Check for soft spots that might suggest water damage underneath.
Document any suspicious findings with photos for later consultation with professionals.
Step 4: Inspect the Attic Space From Inside the House
An attic inspection complements the external check perfectly. Enter your attic with your flashlight and take note of:
– Water stains or discoloration on the underside of the roof deck.
– Mold or mildew growth.
– Signs of daylight shining through roof boards, indicating holes.
– Damp or musty smells pointing to leaks or poor ventilation.
– Condition of insulation – wet or compacted insulation loses effectiveness.
– Presence of pests or rodents that may damage the roof structure.
Mark every issue on your roof inspection checklist so you remember where repairs are needed.
Step 5: Check the Gutters and Downspouts
Clogged or damaged gutters can lead to water backup and roof damage:
– Remove debris such as leaves, twigs, and dirt.
– Look for cracks, rust spots, or sections pulling away from the fascia.
– Verify water flows freely through downspouts.
– Examine gutters for proper alignment and pitch.
Proper drainage is crucial for prolonging roof life and preventing water intrusion.
Step 6: Review Your Findings and Plan Repairs
Once your inspection is complete, review your photos and notes. Prioritize any issues based on severity:
– Immediate repairs: leaks, missing shingles, or structural damage.
– Maintenance: cleaning gutters, removing moss, sealing minor cracks.
– Long-term considerations: plan for eventual roof replacement or upgrades.
Consult a professional roofer for any damage beyond your DIY skills or for safety-critical repairs.
Visual Example: Roof Inspection Checklist Snapshot
| Inspection Area | What to Look For | Condition (Good/Fair/Poor) | Notes/Photos |
|---|---|---|---|
| Shingles/Tiles | Missing, cracked, curling | ||
| Flashing | Rust, gaps, seal cracks | ||
| Gutters | Blockages, damage, alignment | ||
| Attic Roof Deck | Stains, daylight, mold, insulation condition | ||
| Roof Valleys & Ridges | Damage, debris, loose parts |
Final Tips for Successful Roof Inspections
– Conduct roof inspections at least twice a year, in spring and fall, and after severe storms.
– Keep detailed records and photos to track roof wear and guide maintenance over time.
– Use the inspection as an opportunity to clean gutters and remove debris.
– Don’t hesitate to call a roofing professional for complex issues or comprehensive assessments.
Regular, methodical roof inspections are your best defense against small issues snowballing into major repairs. Following this step-by-step guide, armed with a keen eye and safety in mind, you’ll maintain a sound, leak-free roof above your head for years to come.
Tips for a thorough Roof Inspection: What to Look For Before Small Issues Become Big Repairs
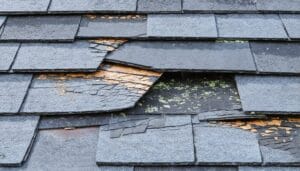
- Check for Missing or Damaged Shingles: Inspect your roof surface carefully. Missing, cracked, or curled shingles can lead to leaks and should be replaced promptly.
- Look for Signs of Water Damage Inside: Go into your attic and check for water stains, mold, or damp insulation. These are early signs of leaks that need immediate attention.
- Inspect Flashing Around Chimneys and Vents: Damaged or loose flashing can let water through. Make sure it’s secure and sealed properly to prevent leaks.
- Examine Gutters and Downspouts: Clogged or damaged gutters can cause water to back up and damage your roof’s edge. Clean and repair gutters regularly.
- Search for Granule Loss on Shingles: Excessive granule loss means your shingles are deteriorating. Granules protect shingles from sun damage, so losing them can shorten roof life.
- Check for Sagging or Uneven Areas: A sagging roof deck can indicate structural problems. Look for any dips or uneven spots on your roof surface.
- Look for Signs of Animal or Insect Damage: Birds, squirrels, or insects like termites can cause harm. Inspect areas around vents and eaves for nests or damage.
- Monitor Roof Ventilation and Insulation: Proper ventilation prevents moisture buildup. Make sure vents are unobstructed and insulation is in good condition.
- Schedule Professional Inspections Annually: While you can do basic checks, a pro can spot hidden problems early. Annual inspections help maintain your roof’s longevity.
💡 Extra tip: Take photos during your inspection to track changes over time. It helps you communicate issues clearly if you need to consult a contractor.
By regularly conducting a careful roof inspection using this checklist, you can catch minor issues early and avoid costly repairs down the line. Prioritize safety by using a sturdy ladder and consider hiring a professional for hard-to-reach or steep roofs. Your roof protects your home, show it some love!
Key Concepts
Roof inspection is much more than a routine task; it is a critical practice that acts as the sentinel guarding the fortress of your home. The very essence of a roof inspection lies in its preventive nature, to catch the subtle signs of vulnerability before they escalate into costly damage. Imagine the roof as a ship’s hull, navigating through the storms and unpredictable elements. Without regular checks, small cracks can turn into gaping holes, letting in the destructive forces of water and wind.
One fundamental concept is understanding the dual nature of roof inspection: external and internal examination. The outside surface reveals the immediate condition of shingles, flashing, and gutters, components that face the brunt of weather extremes. This external view is akin to an artist surveying the canvas before the next brushstroke, ensuring no unsightly damage mars the overall masterpiece. Meanwhile, the interior inspection, often overlooked, explores the unseen battle beneath the surface, the attic and ceiling spaces, seeking moisture stains, mold growth, and structural sagging. These internal signs act as whispers of distress from the roof’s hidden layers.
Another key aspect is the recognition of early warning indicators. Much like a doctor listens to a patient’s subtle symptoms before diagnosing a disease, a roof inspector must be attuned to the faintest hints of trouble: curling shingles, granule loss, soft spots, or pooling water. Each symptom tells a story, a narrative in which nature’s slow but persistent forces chip away at the fortress’s integrity. The presence of moss or algae may seem innocuous, but it often signals moisture retention, which is the silent opponent eroding the roof’s defense.
The role of seasonality and timing in inspections is also pivotal. Roofs experience different types of stress depending on the time of year, winter’s freeze-thaw cycles can cause different damage than summer’s scorching sun. Therefore, inspections are not merely periodic rituals but strategically timed assessments, meant to prepare the roof for future trials. This cyclical awareness mirrors the changing seasons of life itself, where different phases demand unique attentiveness.
Additionally, the concept of holistic integration reminds us that a roof does not exist in isolation. Elements such as gutters, downspouts, ventilation, and insulation are integral to the roof system’s overall health. Ignoring one component is like fixing a leaking pipe but neglecting the foundation it rests on. A comprehensive inspection views the roof as a complete ecosystem rather than isolated fragments.
Lastly, the idea of documenting and understanding aging is crucial. Roof materials wear down over time, much like the pages of an ancient book, each showing signs of the passing years. Recognizing the roof’s age-related decline and correlating it with observed damages provides context to the inspection report, allowing homeowners to make informed decisions rooted in both current conditions and predictive foresight.
In essence, roof inspection is a narrative of vigilance, patience, and holistic understanding. It is a dialogue between the tangible wear-and-tear and the intangible knowledge required to interpret those signs, ensuring that a home’s crowning shield remains robust against nature’s relentless challenges.
Frequently Asked Questions about Roof Inspection
What is a roof inspection, and why is it important?
A roof inspection involves checking both the exterior and interior components of your roof to identify any damage or wear. It’s important because spotting small issues early can prevent costly repairs or even premature roof replacement.
How often should I perform a roof inspection?
It’s best to inspect your roof at least twice a year, typically in spring and fall. Additionally, you should check after major storms to catch any new damage before it worsens.
What should I look for during an outside roof inspection?
Look for missing, cracked, or curling shingles, damaged flashing around chimneys or vents, signs of moss or algae growth, and any sagging areas that indicate structural problems.
What signs indicate interior roof problems?
Inside your home, check the attic for water stains, mold, damp insulation, or daylight shining through the roof boards. These can all signal leaks or roof damage needing immediate attention.
Can I do a roof inspection myself, or should I hire a professional?
While you can perform basic inspections using a checklist, a thorough roof inspection, especially for hard-to-reach areas, is safer and more accurate when done by a professional roofing contractor. They have the expertise to spot hidden issues before they become big repairs.