


To maximize your roof insurance claim in 2025, document damage with high-resolution ground photos from multiple angles, review your policy’s specific coverage limits, immediately tarp damaged areas while preserving evidence, submit AI-ready documentation through required digital channels, engage effectively with virtual adjusters, counter initial settlements with comparative contractor quotes, and appeal denials through proper channels with systematic follow-up. This methodical approach with organized communication records significantly improves your chances of receiving fair compensation in today’s digitized insurance landscape.
Key Takeaways
- Document roof damage thoroughly with high-resolution ground-level photos from multiple angles before making temporary repairs.
- Review your insurance policy carefully to understand coverage limits, exclusions, and specific requirements for roof damage claims.
- Hire only licensed, bonded, and insured contractors for inspections and repairs to maintain claim validity.
- Gather multiple local contractor quotes and neighborhood settlement data to strengthen your negotiation position.
- Prepare comprehensive appeals with independent inspection reports if your claim is denied, addressing each reason specifically.
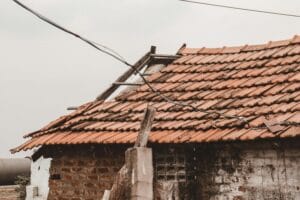
Document Roof Damage With Multi-Angle Drone Photography
While drone photography might seem like a cutting-edge solution for documenting roof damage, this approach is not recommended or required for standard insurance claims. Insurance adjusters typically prefer traditional documentation methods that provide clear, straightforward evidence of damage.
Instead of investing in drone technology, focus on comprehensive ground-level photography with a high-resolution camera. Take multiple photography angles of damaged areas, ensuring each photo has proper lighting and clear visibility of specific damage points. Document all affected sections individually, including close-ups of shingles, flashing, vents, and any visible structural issues.
When submitting your claim, organize these images systematically with labels indicating their location on your roof. This methodical approach provides adjusters with the practical evidence they need without the unnecessary complications of aerial documentation.
Review Your Policy Coverage and Digital Claim Requirements
Before proceeding with documentation, you’ll need to thoroughly understand what your insurance policy actually covers for roof damage. Locate your policy document and identify specific coverage limits for roof repairs or replacement. Most policies distinguish between damage caused by weather events versus wear and deterioration, with different reimbursement structures for each scenario.
Pay close attention to policy exclusions that might affect your claim—particularly clauses related to maintenance requirements, materials restrictions, or age-based depreciation schedules. Insurance carriers now require digital submission formats for claims, including specific file types for photos and documentation. Check your insurer’s online portal or mobile app for their exact digital requirements, as non-compliant submissions often face delays. Understanding these technical specifications beforehand will streamline your claim process significantly.
Secure Emergency Repairs While Preserving Evidence
When your roof suffers damage, immediately tarp compromised areas to prevent further water intrusion while maintaining photographic evidence of the original damage. Before any emergency repairs begin, document the damage thoroughly with timestamped photos and videos to support your insurance claim. Hire only licensed and insured contractors for temporary repairs, as insurance companies may deny claims involving unlicensed work or improper materials.
Tarp Damaged Areas Properly
After discovering roof damage, you must immediately tarp the affected areas to prevent further deterioration while maintaining evidence for your insurance claim. Proper tarp installation requires securing heavy-duty, waterproof material that extends at least 4 feet beyond the damaged section on all sides.
Use 2×4 lumber to anchor the tarp’s edges, rather than nails directly into your roof, which could invalidate warranty or cause additional damage. Make sure the tarp slopes adequately to channel water away from vulnerable areas. Regular tarp maintenance is essential—check daily for wind lifting, tears, or pooling water that could compromise protection.
Document the tarping process with photos and keep receipts for materials, as these emergency mitigation costs are typically reimbursable. Bear in mind that tarps are temporary solutions, generally effective for 90 days maximum before professional repairs must begin.
Document Before Repairs
While tarping protects your damaged roof temporarily, thorough documentation must become your priority before any permanent repairs begin. Insurance adjusters require comprehensive evidence to process your claim efficiently. Preservation of this documentation directly impacts your claim timeline and final settlement amount.
- Take date-stamped photographs of all visible damage from multiple angles, including wide shots and close-ups of specific problem areas
- Record detailed videos narrating the extent of damage, focusing on structural impacts and personal property affected
- Create an inventory list of damaged items with approximate values and replacement costs
- Retain all relevant receipts for emergency services and temporary repairs already performed
Understanding insurance terminology helps you communicate effectively with adjusters. Keep in mind that permanent repairs initiated before proper documentation may complicate your claim, potentially resulting in denied coverage for undocumented damage.
Use Licensed Contractors Only
The selection of properly licensed, bonded, and insured contractors represents a critical component of your roof insurance claim process. When you hire unlicensed contractors, you expose yourself to significant liability concerns and risk claim denial from your insurance provider.
Always verify credentials before signing any agreement. Licensed contractor benefits extend beyond quality workmanship—they include proper insurance coverage, adherence to building codes, and contractual protections that safeguard your investment. Request proof of licensure, liability insurance, and worker’s compensation coverage before work begins.
Many insurers maintain approved contractor lists. Using these pre-vetted professionals can streamline your claim process and guarantee repairs meet required standards. Keep in mind that proper licensing isn’t just about paperwork—it’s your protection against future complications and a prerequisite for warranty validation.
Submit Your Claim With AI-Ready Documentation
Insurance companies increasingly deploy artificial intelligence to evaluate roof damage claims, making properly formatted documentation essential for successful outcomes. Your claim submission tips should focus on creating AI-ready documentation that expedites processing and improves approval chances.
- Capture high-resolution photos with proper lighting and multiple angles showing all damage details
- Include metadata with each image (date, time, GPS coordinates) to verify authenticity
- Submit videos with narration explaining damage progression and potential causes
- Organize documentation in digital folders following insurance carrier’s preferred format
AI documentation benefits include faster claim processing, more accurate damage assessment, and reduced likelihood of denial based on insufficient evidence. When you prepare your documentation with AI systems in mind, you’re speaking the same language as the automated systems analyzing your claim, significantly improving your chances of fair compensation.
Navigate the Virtual Adjuster Assessment Process
Modern roof claim assessments increasingly rely on virtual adjuster technology, transforming how homeowners interact with insurance carriers during the claims process. When your virtual assessment is scheduled, guarantee ideal lighting conditions and prepare to showcase all damaged areas through your device’s camera.
Implement effective adjuster communication strategies by asking specific questions about coverage details and documenting their responses. Request clear explanations of any disputed items or coverage limitations they identify during the assessment. Many carriers now use AI-powered visual recognition to validate damage patterns, so capture comprehensive video evidence before the appointment.
Follow virtual assessment tips like testing your internet connection beforehand, having your policy number readily available, and preparing a list of damage-related questions. Stay professional but assertive throughout the process to guarantee your claim receives thorough consideration.
Counter Initial Settlement Offers With Comparative Data
When responding to initial settlement offers, you’ll need substantial comparative data to strengthen your negotiating position. Initial offers typically fall below market rates, but with proper data analysis, you can counter effectively. Your negotiation tactics should include presenting verifiable evidence that supports your claim valuation.
- Collect recent roofing quotes from multiple local contractors showing current material and labor costs
- Compile neighborhood claim settlement data for similar roof damage scenarios
- Document regional pricing increases due to inflation and supply chain factors
- Prepare side-by-side comparisons between your contractor’s assessment and the insurer’s valuation
Present this comparative information in a professional, organized manner. When insurers see you’ve done your homework, they’re more likely to adjust their offer. Remember to remain firm but reasonable throughout negotiations—excessive demands can damage your credibility and delay resolution.
Appeal Denied Claims Through the Digital Resolution Portal
If your roof claim has been denied, you’ll need to understand the proper appeal channels rather than relying on any digital resolution portal, as most insurers don’t offer such systems for claim disputes. Instead, focus on traditional appeal methods through your insurer’s formal review process.
Begin by requesting a written explanation of claim denial reasons, which typically includes policy exclusions or insufficient documentation. Then prepare your appeal with additional evidence like independent roof inspection reports, weather data, and contractor assessments.
Submit your appeal in writing, addressing each denial reason with corresponding evidence. While digital appeal strategies aren’t centered around portals, you should still document all communications electronically and maintain digital copies of all submitted materials. Follow up regularly on your appeal status through your assigned claims representative or the claims department supervisor.
Frequently Asked Questions
How Long Do I Have to File a Roof Claim After Damage?
Time is incredibly precious when your roof suffers damage! You typically have one year to file a claim, but deadlines vary dramatically by insurer and state—some allow just 30 days while others give you up to two years. Don’t wait! Contact your insurance company immediately after discovering damage. Complete damage documentation quickly with photos and professional assessment reports. Review your policy’s specific claim deadlines to guarantee you won’t miss your opportunity for coverage.
Will Filing a Roof Claim Increase My Insurance Premiums?
Filing a roof claim may increase your insurance premiums, though this isn’t guaranteed. The premium impact typically depends on your claim frequency and history. If this is your first claim in several years, the increase might be minimal. However, multiple claims within a short period often trigger significant rate hikes. Some insurers also offer claim forgiveness programs for long-term customers with good records. Check your policy details or consult your agent for your specific situation.
Can I Choose My Own Roof Contractor for Repairs?
Yes, you can choose your own roof contractor for repairs. Insurance companies typically allow homeowner contractor selection as long as they’re licensed and insured. This gives you control over repair quality and workmanship. However, your insurer may have preferred vendors with pre-negotiated rates. If you select your own contractor, make sure they’ll work within your insurance company’s approved estimate or be prepared to pay any difference out-of-pocket. Always confirm your selection rights in your policy.
Are There Seasonal Considerations for Roof Claim Approval Rates?
Like a bear knowing when to hibernate, you should understand roof damage seasonality and claim submission timing. Yes, approval rates often fluctuate seasonally. You’ll typically see higher approval rates in spring and fall when weather damage is fresh and adjusters aren’t overwhelmed. Summer brings storm damage peaks, creating backlogs. Winter claims face challenges with snow concealing damage. For best results, document damage immediately but consider filing during less busy periods when adjusters can give your claim thorough attention.
What Roof Materials Offer the Best Insurance Premium Discounts?
You’ll find the best insurance premium discounts with impact-resistant materials like Class 4 rated asphalt, metal, or slate. Energy efficient roofing options, including cool roofs with reflective coatings, can reduce premiums by 5-25%. Insurance companies favor durable materials like metal, tile, and synthetic composites that withstand severe weather. Many providers offer tiered discount structures based on material longevity ratings. Remember to submit manufacturer certifications when requesting premium reductions on your policy.